Monday, November 22, 2010

Sugar Cookies!


We got our first snow today! I spent all day watching the snow come down and the first thing I wanted to do is go sledding when I got the chance. So when I got home I spent a solid 30 minutes finding the right snow gear and bundling up then I was ready! My sister, my dog Lua, and I headed out very excited to play in the fresh snow. Unfortunately, it's a little hard to sled in a 1/2 inch of snow. Instead, I figured the next best thing to do in the spirit of the snow was to make sugar cookies!


Sugar cookies are easily my favorite holiday cookie because I don't have good sugar cookies often. Plus I get to frost them! So I tried my hand at it. I got this recipe from Vegan Cookies Invade Your Cookie Jar. This book is my hands down favorite.
Here is the recipe:

2 1/3 cups all-purpose flour
2 tbsp cornstarch
1/4 tsp salt
1/4 tsp baking powder
1/2 cup margarine, slightly softened (like Earth Balance "butter" sticks)
1/2 cup nonhydrogenated vegetable shortening
1 cup sugar
2 tsp pure vanilla extract
1/2 tsp lemon extract (you can also use almond, maple or any other flavor)
1/4 cup vanilla soymilk (or other non-dairy milk)

In a bowl, sift together the flour, cornstarch, salt and baking powder and set aside.

In a larger bowl, cream the shortening, margarine and sugar with electric beaters until the mixture gets all soft and fluffy, for at least 4 minutes.

Scrape the sides of the bowl with a rubber spatula to ensure everything mixes in. Now beat in the vanilla and lemon extracts and the soymilk until everything is just combined.

Beat in half the flour and when it is thoroughly moistened, and then mix in the rest to form a soft dough.

Divide the dough into two and pat each portion into a disc. Wrap each disc in plastic wrap and refrigerate for a few hours or overnight.

On a lightly floured platform or board, roll each disc to about 3/8ths-inch thickness. Cut it into shapes with a cookie cutter. Place the cookies on a baking sheet lined with parchment paper, about 1-inch apart. Reroll leftover scraps and shape into more cookies.

In a preheated, 350-degree oven, bake the cookies for about 10 minutes until done.

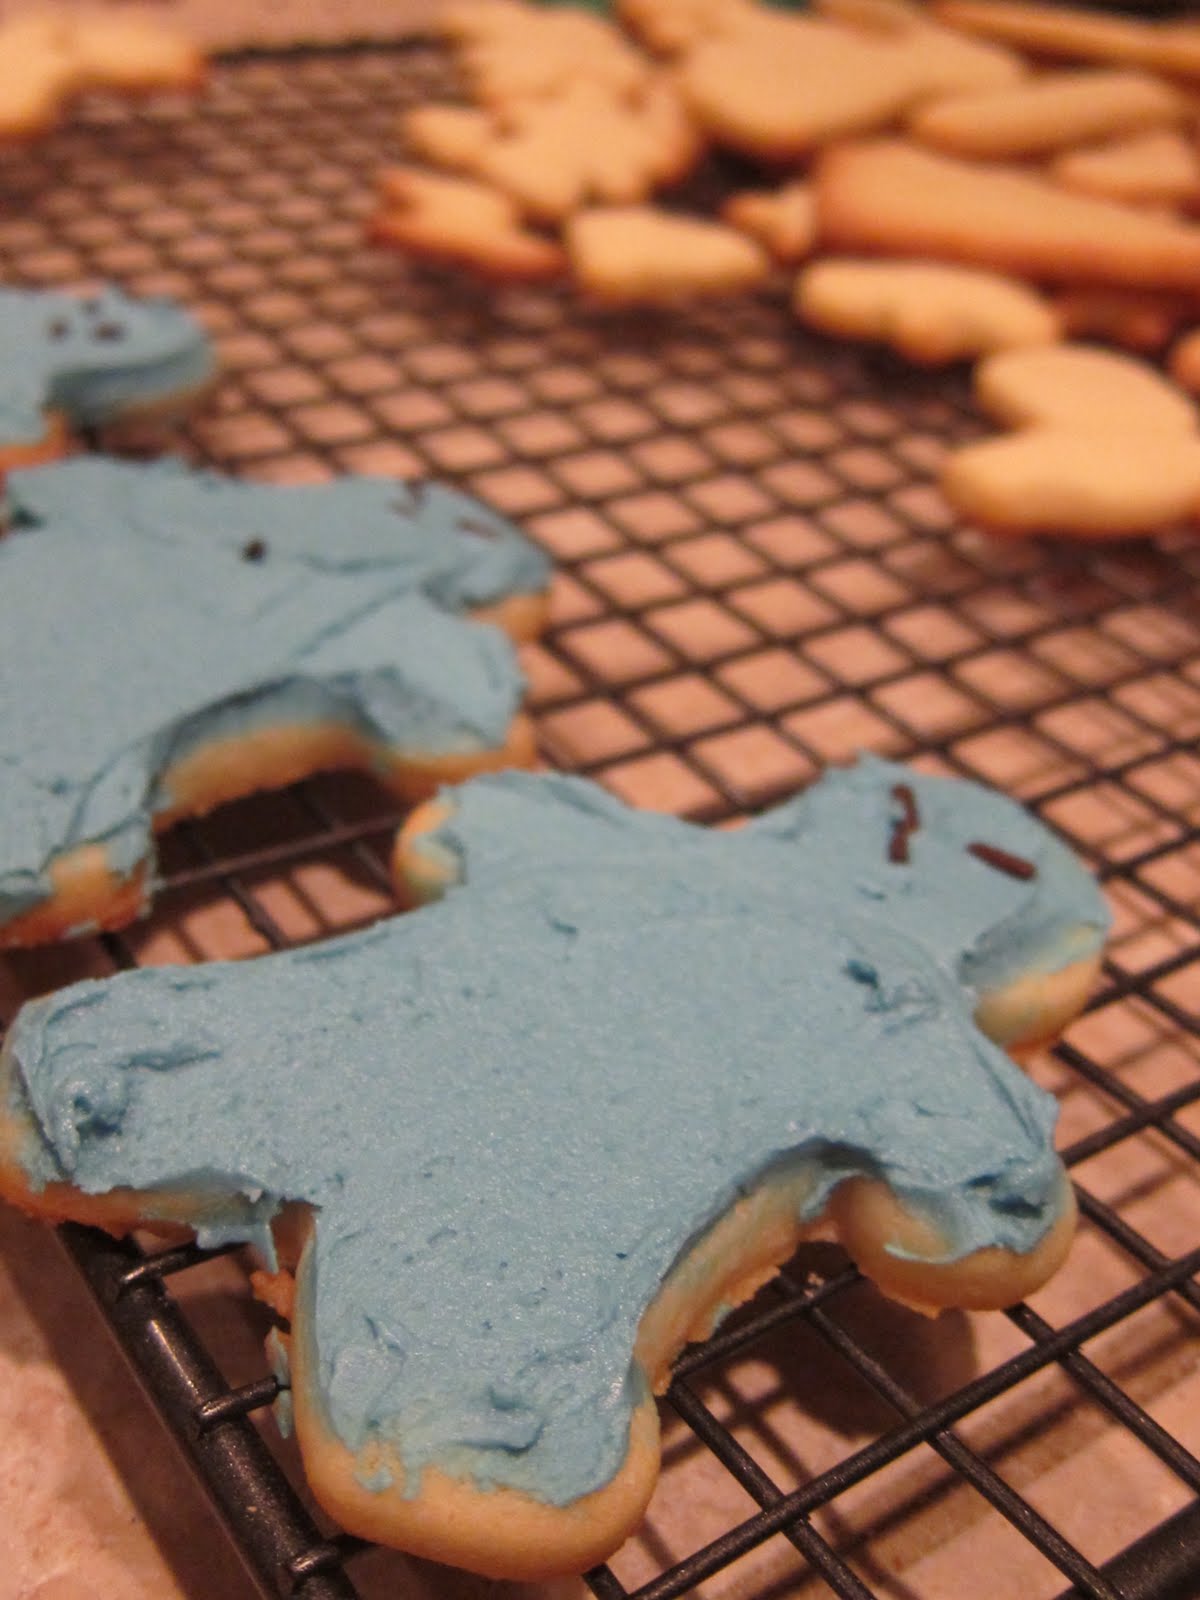
Remove the cookies from the oven and allow them to cool for five minutes. Then transfer to a wire rack to cool completely before decorating.


I know it isn't a great picture but I had to include the blue man group I made from my sugar cookies!


(Recipe from the book Vegan Cookies Invade Your Cookie Jarby Isa Chandra Moskowitz and Terry Hope Romero, published by Da Capo Lifelong, a member of the Perseus Books Group. Copyright © 2009.

Wednesday, September 8, 2010

Weekend Pancakes


I am such a breakfast person. Nothing starts my day better than getting breakfast at a little hole in the wall place that looks a little sketchy out front with my good friends. Breakfast isn't very vegan friendly unless you are down to eat dry toast a lot of the time. My new favorite vegan place to eat breakfast is Wayward Vegan Cafe in the University District of Seattle. Since its a little far to get breakfast everyday I decided to make my own pancakes.


I am not sure what I did but they didn't quite turn out for me. Mine were really thick and not quite cooked the way I wanted. So it didn't really satisfy my breakfast fix. Here is the recipe I used from Vegan Yum Yum.

1 1/2 cups soymilk
1 cup spelt flour (or sub for all-purpose)
1/3 cup all-purpose
2 tablespoons oil
1 tablespoon sugar
1 teaspoon baking powder
1 teaspoon extract ( any flavor, I used almond)
1/4 teaspoon salt
1 to 2 tablespoons water, to thing batter if need
Earth Balance margarine, to serve
Maple syrup, to serve


I got this recipe from the book "Vegan Yum Yum: Decadent ( But Doable) Animal-Free Recipes for Entertaing and Every Day" (c) Lauren Ulm 2009

Friday, September 3, 2010

Crispy Sesame Kale


I will let you all in on a little secret most people don't know about me. I HATE VEGETABLES. Carrots, peas, lettuce, etc. I've just never been a big fan. For example, when I order vegetable dishes like stir-fry, I go for the broccoli and only touch the other vegetables so I can move them aside. One type of vegetable terrifies me more than all the others: Leafy greens! I despise them!

Recently I have been making an effort to try and enjoy my vegetables more and their benefits. So when I was deciding what to make for dinner tonight I was faced with a decision: Baked Mac and Cheeze or the Crispy Sesame Kale. It was not an easy one. I went back and forth in my mind for a solid hour but I finally decided to face my most formidable enemy and make the kale dish. And it worked! Doubtful thoughts were raging even as I was making the dish. I halved the amount of kale so I didn't waste any, assuming I would hate it. However, when that Kale came out of the oven I was so surprised by how crispy the kale had turned out after baking it. It really had the perfect balance of salt and sesame.

So here is the recipe that I got out of the Vegan Yum Yum book:

1 head of kale, washed and deveined(deveined kale below)
1 tablespoon of toasted sesame oil
1 tablespoon of sesame seeds
1 pinch of salt


1. Preheat the oven to 375 degrees.
2. Tear the kale into bite-size pieces then spread it out evenly on a cookie sheet that is covered in foil. Drizzle oil on top, then scrunch kale with your fingers until the oil is evenly distributed over the greens.
3. Sprinkle the sesame seeds and salt over the top.
4. Bake in the oven for 10 minutes, until the leaves are crispy but still dark green and serve.


I ate mine with some rice and it was a perfect little meal. For once I ate all my vegetables! Make your parents proud and eat your veggies!


I got this recipe from the book "Vegan Yum Yum: Decadent ( But Doable) Animal-Free Recipes for Entertaing and Every Day" (c) Lauren Ulm 2009

Wednesday, August 11, 2010

Raw Strawberry Cheesecake

Just recently I have been learning about raw veganism or living foods diet. Raw cooking prompts uncooked, unprocessd, organic food. Raw veganism excludes animal products and food cooked past a certain temperature. When I first heard about raw veganism a few years ago all I could think is "what do they eat?!" As I've recently discovered quite a bit, there is a huge raw food scene and for good reason. Contrary to popular belief, raw veganism is actually beneficial to your health and has even been proven to turn around diabetes. After some research and help from friends, this book was recommended to me: I am Grateful I promptly checked it out from the library and have completely fascinated since.


By reading and researching more about raw veganism I learned it requires a TON of patience. For example, the picture above shows the cashews that I had to soak for at least 3 hours before I could even begin the actual cheesecake! But the end product is totally worth it. It takes a lot of equipment, patience, and dedication to be raw. I may not have the patience to become full raw, but the benefit of a having a guilt-free, healthy dessert is too good to pass up. Plus I got beautiful local strawberries for a dollar! Score!


Although I love the book I Am Grateful, I found a simpler version on Post Punk Kitchen. You can find the recipe for this on that link. When making this its important to buy raw organic foods, to stick to true raw forum. I know cashews are a little pricey but if you buy pieces versus whole cashews, its a little cheaper.

My notes for this recipe:

  • The recipe calls for about 4 cups of strawberries, but don't be shy. It could definitely use more strawberry flavor. If you are well supplied bump it up to 5 cups to make it perfect.
  • Let the Fluffy White Frosting sit for as long as the cheesecake. With 3 hours in the fridge, mine was still a bit runny.
  • Make sure to grind the nuts for the crust really finely. That will give it that consistency of a traditional graham cracker crust.
  • Don't let this cheesecake sit out! I brought mine on a nice little picnic and it ended up being a puddle like mass in the bottom of my plastic container. . . whoops.


If you have the time try this! It's really delicious and fun to make actually. Its amazing how you can make this just out of raw ingredients.

Sunday, August 8, 2010

Chipotle Basil Corn Chowder


Here's another great recipe from Vegan Yum Yum. When I first saw this recipe in Laruen Ulm's book, I thought "yum corn chowder". The first time I had corn chowder I was at Bamboo Garden in Seattle, an amazing vegetarian/vegan chinese resturant. The thought of corn chowder brings me back to basking in the sun at Gas Works Park last summer with my good friends. Long story short, corn chowder just warms my heart a little. Adding chiptole and basil to the mix is even more exciting.

I actually made this soup at my work the day after I first made it at home. It sold out! It was a major cofidence boost. Plus, a co-worker of mine thought me the proper way to cut onions. I had no idea how simple it could be.


So down to business:

1 tablespoon olive oil
1 small onion, finely diced
5 small red potatoes, diced small (3 cups)
1 cup shredded carrot
1 teaspoon chipotle in adobo, minced (canned)
3 cups water
1 vegetable bouillon cube
3 cup sweet corn (5 to 6 ears), divided
1/2 cup soy milk
1/2 teaspoon salt
1 tablespoon lime juice
1/2 cup fresh basil, chopped
Fresh black peppper to taste

1. Heat the olive oil in a large pot with a tight fitting lid. Add the onions and saute until golden. Add the potatoes, carrot and chipotle and stir to coat. let them cook over medium heat and cover, cooking for 10 minutes or until tender.

2. Add the water and bouillon cube and mix well, scarping what sticking off the bottom of the pan. Bring to a boil, then reduce heat and cover, cooking for 10 mintues or until potatoes are tender.

3. Transfer all or hald of the mixture to a blender ( only transfer 1.2 if you want some potato chunks kin the finished product.) Add half of the corn, soy milk, salt, and lime juice and blend until smooth. Return to the pot and stir in most of the basil ( keep out a few of the leaves for garnish) and black pepper to taste.

4. Ladle the soup into bowls and distirbute the remaining corn over the top. Garnsih with black pepper and a few small basil leaves. Serve immediately.


I got this recipe from the book "Vegan Yum Yum: Decadent ( But Doable) Animal-Free Recipes for Entertaing and Every Day" (c) Lauren Ulm 2009

Thursday, July 29, 2010

Coconut Lime Tofu (The Disaster!!)

I figured I should share the good and the bad of my vegan cooking journey. This falls under the bad catergory. Honestly, I hate tofu! At least as a main ingredient. The key to cooking with tofu ( in my opinion) is to make it taste like something else. For example, I have made super yummy tofu ricotta before for a stuffed shells dish.


I chose to make this dish because I was cooking with my friend Kenny and we were short on time. We agreed this looked easy and tasty, so we went for it. I got this recipe from "Vegan Yum Yum" the cook book. The author also has an amazing blog I have mentioned before called Vegan Yum Yum, check it out!
Vegan Yum Yum


Since tofu scares me a little, I decided to make some rice to it tofu. My family recently got a new rice cooker and I have no idea how to use it. And because I have always had a rice cooker, I don't actually know how to cook rice. So in the pictures coming up you will see rice, but it wasn't even cooked. Such a failure.

Here is the recipe, with suggestions. . .

1 14-ounce package tofu, drained and well pressed.*
2/3 cup coconut milk
1 half lime, peeled
2 teaspoons sugar
zest of 1 lime

1. Preheat the oven to 400 degrees. Oil an 8x8 inch baking dish.

2. Cut tofu into 8 equal pieces as follows: Lay the block in front of you, hamburger style (widthwise if you missed pre-school) Cut into 4 equal slabs. Lay each slab on its side and cut in half, hotdog style, making a skinny rectangle.

3. Add coconut milk, soy sauce, lime, sugar and lime zest to a blender or food processor and blend well. This will make a marinade.

4. Add the tofu to a casserole dish and pour the marinade over it. Bake for 25 minutes, flip, and bake for additional 10 minutes, or until the vast majority of the marinade is evaporated. Remove and let rest before serving.

*Pressing tofu is removing the moisture. Freezing works well, but it changes the texture. I suggest taking a paper towel to it. I didn't remove enough moisture from this dish, another reason for its failure.


My suggestions:
For one, we cut the tofu way too thick, when we cooked it in the oven it took twice as long and it was still very mooshy. This is NOT a quality I like my tofu to have, actually any of my food, for that matter. As you can see the marinade is barely covering the tofu in the picture above.

Another note, this recipe calls for WAY too much lime. I'd use half or less. Needless to say, this dish was just not good, for many reasons. I actually didn't eat any of it except a little nibble. I tried to dress it up in the finished pictures but there was no going back really. Better luck next time.


I got this recipe from the book "Vegan Yum Yum: Decadent ( But Doable) Animal-Free Recipes for Entertaing and Every Day" (c) Lauren Ulm 2009

Monday, June 28, 2010

Chocolate Fudgy Oatmeal Cookies


There is something magical about a warm cookie. Just because a cookie is vegan doesn't mean it is missing out on that unmatched magical feeling that comes from any other cookie. They are easy and always super good. When it comes to baking vegan, I depend on a few ladies from The Post Punk Kitchen.

The recipe I used here was from their book Vegan Cookies Invade Your Cookie Jar.
One of my favorites for good reasons. These cookies are amazing and super gooey which is a must have quality for cookies in my opinion.


So here we go.

Dry Ingredients
2 cups quick-cooking oats
1 2/3 cups all-purpose flour
2/3 cocoa powder
1/2 teaspoon baking soda
1/2 teaspoon baking powder
3/4 teaspoon salt
1 tablespoon corn starch*

Wet Ingredients
1 1/2 cups sugar
2/3 cup nondairy milk ( I use Silk)
2/3 cup canola oil
1 1/2 teaspoons vanilla extract
1/4 teaspoon almond extract
3/4 cup chocolate chips

* so side note. The orginal recipe calls for 2 tablespoon ground flax seeds. I can only ever find whole flax seeds! I actually have a package I bought of them from light-years ago just hanging out in my pantry. As I have learned in the cook book, you can substitute half the amount of flax seeds for starch. Their real purpose is to serve as a binder, as an egg would in regular cookies.

1. Preheat oven to 350 degrees. Line two baking sheets with parchment paper.

2. In a medium sized bowl, stir the dry ingredients together and set aside.

3. In a large bowl beat together wet ingredients. Fold in half of the flour mixture to moisten, then fold in the other half into the wet ingredient mixture.

4. Add the chocolate chips just before mixture is complete.

5. For each cookie, drop 2 generous table spoons of dough onto the cookie sheet, leaving about 2 inches of space between each cookie. ( I rolled mine so they would be a bit more even looking after they baked)

6. Bake for 10 to 12 minutes until cookies are firm and risen. Let cool on baking sheet for 5 minutes then transfer to wire rack.


These cookies turned out to be really gooey and delicious, even though they aren't exactly pretty.

Wednesday, June 23, 2010

Portobello Fajitas


When I first got into the vegetarian/vegan scene a few years ago, my supportive vegan Uncle Paul bestowed upon me this massive bible of a cookbook entitled Vegan Planet. At the time I didn’t understand what I had just stumbled upon. Thankfully, I have revisted this book and discovered its true brilliance. Not only is it packed with 400 plus delicious world vegan recipes and recipes of the vegan basics such as seitan, it has a ton of information of how to eat vegan and have good health too. I highly recommend this book to anyone seriously interested in learning about a vegan lifestlye.


So while flipping through Vegan Planet I found a really easy recipe for Portobello Fajitas. Portobellos are the quickest way to my heart so natuarally I had to try it out. This recipe also called for a fresh tomato salsa which was in the book as well. And here it is. You would want to make this first because it recommends letting it rest at room tempuranture for about an hour prior to dishing it up. It can also keep in the refridgerator for 3-5 days.

3 large ripe tomatoes, peeled, seeded, and chopped
1 small, fresh red chilie (optional)
4 scallions, minced
1 clove garlic (I used 2 because I looooove garlic)
1 tablespoon lime juice
¼ cup minced fresh cilantro leaves
Salt and fresh cracked pepper to taste
Makes about 2 ½ cups
1. Combine tomatoes, chilie, scallions, and garlic in a large bowl. Mix.
2. Add lime juice, cilantro, and salt and pepper to taste. Let sit.

The thought of seeding a tomato terrfied me because I had no idea how to do such a thing and it didn’t help that I didn’t see the seeding part of the recipe until half way into the first tomato. So needless to say I destoryed those beautiful tomatoes trying to remove the seeds. Save yourself the trouble and google it or follow this link. Oh the time I could have saved if I just googled it first.

http://mexicanfood.about.com/od/techniques/ht/seedtomatodice.htm


Now here is my finished salsa! On to the fajita.

2 tablespoons olive oil
1 large red onion (I had to use yellow due my red onion being rotten)
1 large red bell pepper, seeded and thinly sliced
1 large green chilie pepper (This is my addition)
4 large portobello mushrooms, stems removed and caps cut into strips
1 teaspoon chili powder
½ teaspoon salt
¼ teaspoon cayenne (optional)
Flour tortiallas, warmed
Fresh tomato salsa from above


1.Heat olive oil in large skillet or wok over medium-high heat.
2.Add onion and bell peppe, cover, and cook until tender, about 5 minutes.
3.Add mushrooms and add spices. Stir to coat the vegetables for about 3-5 minutes. Reduce heat to low to keep warm.
4.Warm tortillas if desired.
5.Dish up the filling on a tortilla, add salsa.

Sunday, June 6, 2010

Creamy Tomato Thyme Pasta

A few months ago I discovered the blog Vegan Yum Yum.


I was (and still am) completely obessed with the food, the photogrpaghy, and by how easy the recipes I tried were to follow. I was instally inspired because cooking and vegan/vegetarion food are two of my greatest passions. So, I went out and bought her book. This recipe was the first one I tried.


And it was delicious! I loved this dish for several reasons. For one, it was super easy. Two, it used fresh tomatoes which, I picked up and the local fruit stand. Yummm. And finally, the use of cashews. Vegan food forces you to learn so many different properties of food to capture the right taste you want to achieve. Cashews are a great example of that. To create that creamy-ness, you blend the cashews, and it creates that flavor and I love that!


Here is the recipe. I did tweak it for my own liking but you can find the orginal recipe in the link above.


8 oz. whole wheat spaghetti
2 ripe tomatoes
1/2 raw cashews
1/4 cup water
1 tablespoon tomato paste
2 tablespoons olive oil
4 cloves of minced garlic
1 teaspoon garlic salt
3 tablespoons water (if nessecary)
freshly cracked
thyme( to liking)

1. Boil water that has been well seasoned and cook pasta according to box

2. Core tomatoes and roughly chop up. Throw it all into a blender. Add cashews, water, and tomato paste. Blend until it is very smooth.

3. In a large pan, saute garlic on medium heat in olive oil. Careful not to burn. About 30 seconds to a minute.

4. Pour sauce into pan and bring it to a simmer. Add the salt. Cook for 4-5 minutes. Occasionally stirring.

5. Add water to thin out if you please. Let it simmer till pasta is ready.

6. Drain pasta and add it to pan with sauce. Season to taste with pepper and thyme. Serve!